For centuries, civilizations have revered the sun as the ultimate source of life and energy, a tradition beautifully captured in the yogic practice of Surya Namaskar. More than just a sequence of stretches, this ancient series of postures offers a complete and energizing workout for the body and mind, improving flexibility, strength, and balance while promoting mental focus and relaxation. Whether you’re looking to lose weight, improve your complexion, reduce stress, or simply connect with your inner radiance, Surya Namaskar offers a potent pathway to holistic well-being
- Surya Namaskar: What is it?
- Surya Namaskar Steps to Follow
- See also: Chandra Namaskar step-by-step for beginners Moon Salutation
- Step 1. Pranamasana (Prayer pose)
- Step-by-Step Guidelines for Pranamasana (Prayer pose)
- Benefits of Pranamasana (Prayer pose)
- Step 2. Hastauttanasana (Raised arms pose)
- Step-by-Step Guidelines for Hastauttanasana (Raised arms pose)
- Benefits of Hastauttanasana (Raised arms pose)
- Step 3. Hastapadasana (Standing forward bend)
- Step 4. Ashwa Sanchalanasana (Equestrian pose)
- Modifications
- Step 5. Dandasana (Stick pose)
- Step 6. Ashtanga Namaskara (Salute with eight parts or points)
- See also: Yoga Asana Types: A Complete Guide
- Step 7. Bhujangasana (Cobra pose)
- Step 8. Adho Mukha Svanasana (Downward facing dog pose)
- Step 9. Ashwa Sanchalanasana (Equestrian pose)
- Step 10. Hastapadasana (Standing forward bend)
- Step 11. Hastauttanasana (Raised arms pose)
- Step-by-Step Guidelines for Hastauttanasana (Raised arms pose)
- Benefits of Hastauttanasana (Raised arms pose)
- Step 12. Tadasana (Mountain Pose)
- The Many Benefits of Sun Salutations
- Surya Namaskar Video
- Mental Benefits:
- Conclusion
- FAQ
Surya Namaskar: What is it?
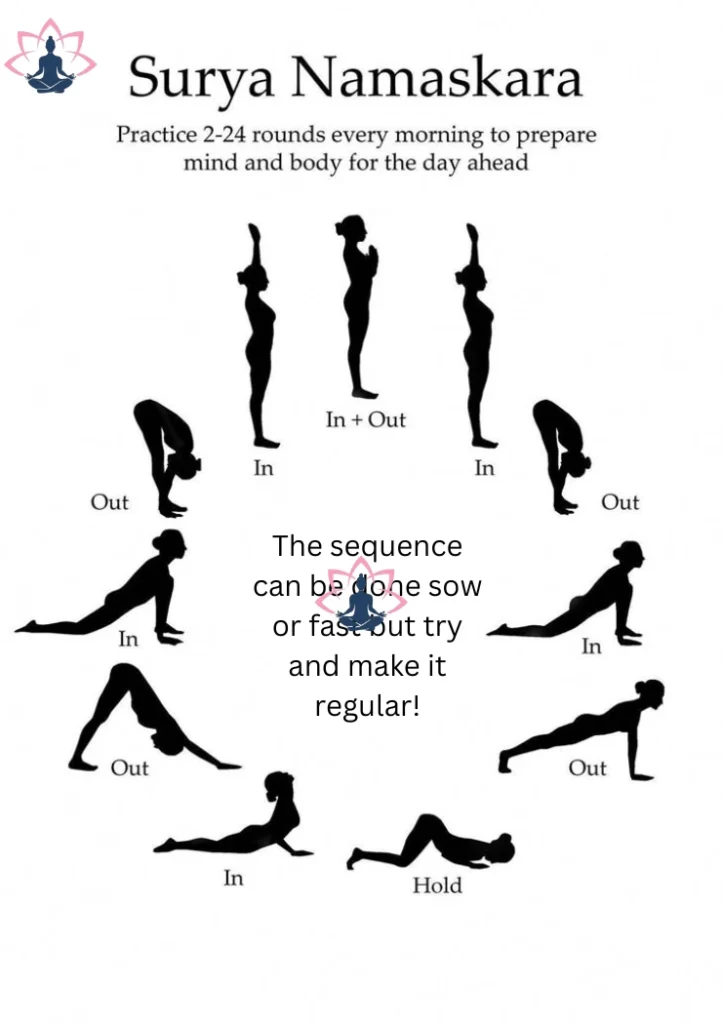
Sun Salutation, also known as Surya Namaskar, is a series of twelve potent yoga positions. In addition to being an excellent cardiovascular exercise, Surya Namaskar is well known for its profoundly beneficial effects on the body and mind.
It is advisable to perform Surya Namaskar steps in the morning without eating. Twelve yoga poses make up each of the two sets that make up a Sun Salutation session. There may be multiple variations of the Sun Salutation technique. For optimal effects, it is recommended to practice a single version on a regular basis.
In addition to promoting health, Surya Namaskar offers a chance to thank the sun for supporting life on Earth.
Surya Namaskar Steps to Follow
See also: Chandra Namaskar step-by-step for beginners Moon Salutation
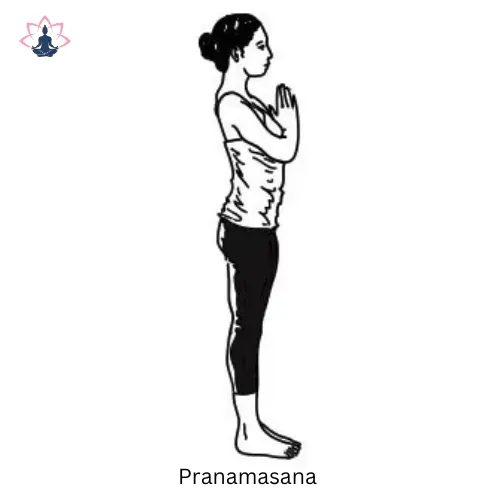
Step 1. Pranamasana (Prayer pose)
A fundamental yoga pose that embodies respect and thankfulness is Pranamasana, sometimes referred to as the Prayer Pose. It’s a basic and adaptable pose used in many aspects of yoga practice. Asana is a position, while Pranam, which has Sanskrit roots, means “to pay respect.” In order to center oneself, set intentions, and express thanks, it is frequently included at the beginning and finish of yoga lessons. The Anjali Mudra and the spoken greeting Namaste, which means “offering” and “I bow down to the Self in you,” are commonly used in conjunction with this pose.
Step-by-Step Guidelines for Pranamasana (Prayer pose)
This is a detailed tutorial on how to do Pranamasana:
- Start in the mountain pose, or tadasana: With your arms by your sides, shoulders relaxed, and feet together, take a tall stance. Your weight should be split equally between both feet.
- Bring your palms together: Take a deep breath and place your palms in front of your chest in the pose of prayer. Your elbows should be slightly pulled outward, and your fingers should point upward. Make sure the fingers are aligned evenly. Elbows can be rested at the side of the body.
- Concentrate on your breathing: Gently close your eyes and inhale deeply several times, letting your attention focus on the pattern of your breathing. Feel your chest rise and fall.
- While grounding via the feet, keep your shoulders relaxed and your spine straight.
- For a few breaths, hold the stance. Make contact with your inner self.
Open the eyes and gradually lower the hands to release.
Benefits of Pranamasana (Prayer pose)
Pranamasana has a number of advantages:
- Promotes focus and relaxation: It is perfect for starting a yoga practice because it promotes focus and relaxation.
- Mind-centering: Pranamasana is a technique used to settle the body, center the mind, and become ready for more in-depth spiritual investigation.
- Shows appreciation: It acts as a reminder to respect oneself, other people, and the interdependence of all living things.
- Develops attention: You can maintain your focus by doing this pose before starting the yoga mudras.
- Common Salutation: In India and many eastern nations, the most popular greeting is the pranasana.
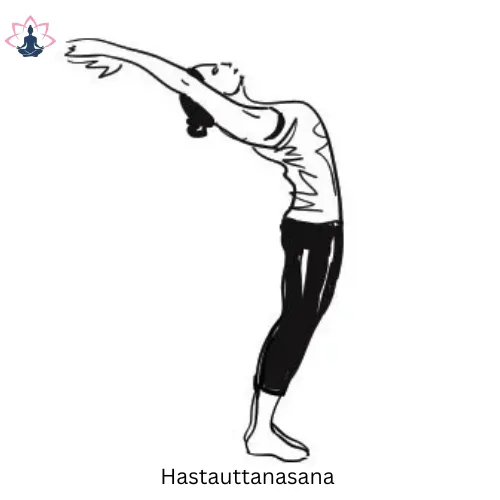
Step 2. Hastauttanasana (Raised arms pose)
A basic yoga pose that is frequently performed as part of the Sun Salutation (Surya Namaskar) sequence is Hasta Uttanasana, also known as the Raised Arms Pose. As the sequence’s second and eleventh posture, it opens the chest for deeper breathing while strengthening and warming the spine. Most people can achieve this stance, which has several advantages.
Step-by-Step Guidelines for Hastauttanasana (Raised arms pose)
Here is a detailed method to successfully doing Hasta Uttanasana:
- Start in Tadasana by standing tall, keeping your arms at your sides, your feet together, and your weight properly distributed. Pay attention to steady, deep breaths.
- Engage Your Legs: For stability, squeeze your legs together while using your thigh muscles.
- Raise Your Arms: As in Urdhva Namaskarasana1, take a deep breath and raise your arms aloft, bringing your palms together. Look up at your hands while maintaining a straight arm position.
- Shift Hips Forward: To keep your balance, gently shift your hips forward while putting your legs down.
- Activate Pelvic Floor: For support, contract your pelvic floor muscles.
Benefits of Hastauttanasana (Raised arms pose)
- Enhances Digestion: This position has the potential to enhance digestion.
- Tones and Stretches Muscles in the abdomen: Tones the abdominal region.
- Increases Chest and Rib Cage: It increases the chest and rib cage, which makes it possible to completely utilize the lung’s capacity and take in oxygen.
- Spine Strengthening: Make the spine stronger.
- Stretches Shoulders and Upper Back: Regularly performing this exercise can help you stretch and open up your shoulders and upper back.
Step 3. Hastapadasana (Standing forward bend)
Hastapadasana, often referred to as the Hand-to-Foot Pose or the Standing Forward Bend, is a fundamental yoga pose that has many mental and physical advantages. The name emphasizes the goal of the position, which is to move your hands towards your feet, and is derived from the Sanskrit words “Hasta” (hand) and “Pada” (foot). Additionally, it is one of the Surya Namaskar’s twelve asanas.
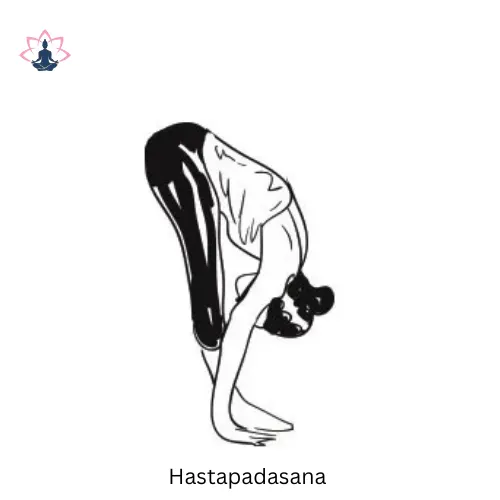
Step-by-Step Guidelines for Hastapadasana (Standing forward bend)
- Starting Position: Place your arms at your sides and stand upright with your feet together. Your weight should be properly distributed over both feet.
- Breathe in: Raise your arms over your head.
- Exhale and Bend: As you exhale, hinge from the hips and bend forward and downward toward your feet.
- Maintain the Position: Try to keep your spine and legs as straight as you can. Try to place your hands on your legs if you are unable to reach the floor, or on the floor next to your feet.
- Deep Breathing: Hold the pose for 20 to 30 seconds while keeping your breathing deep. Try to raise your hips and tailbone higher, squeeze your heels down, relax your head toward your feet, and bring your chest closer to your knees with each exhale.
- Breathe in, extend your arms upward, and then gently raise yourself to a standing posture.
- Exhale and Release: Raise your arms to the sides as you exhale.
Benefits of Hastapadasana (Standing forward bend)
Hastapadasana provides several advantages:
- Boosts Flexibility: It makes the spine flexible and stretches the back muscles. Lower back and thigh muscle flexibility aids in stress relief.
- The thyroid, endocrine, pituitary, pineal, and adrenal glands are among the glands that are stimulated.
- Enhances Circulation: Enhances upper body blood circulation.
- Abdominal Organ Toning: This technique tones the abdominal organs. Hastapadasana enhances liver and spleen function and speeds up metabolism. Constipation symptoms can be reduced and digestion aided by gently compressing the abdomen.
- Vata is balanced: Vata is balanced.
- Reduces Stress: People who are coping with long-term issues like stress and back discomfort may find that hastapadasana is very helpful.
Step 4. Ashwa Sanchalanasana (Equestrian pose)
A useful yoga pose that is frequently included in the Sun Salutation (Surya Namaskar) sequence is Ashwa Sanchalanasana, sometimes referred to as the Equestrian Pose or Low Lunge. In Sanskrit, “Asana” implies location, “Sanchalan” indicates movement, and “Ashwa” represents horse. This position improves balance, strengthens the legs, and stretches the hip flexors.
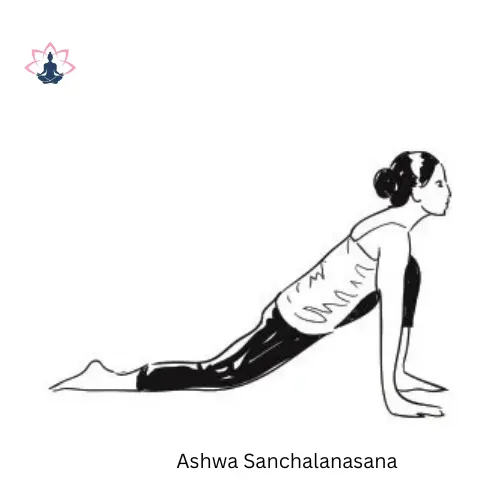
Step-by-Step Guidelines for Ashwa Sanchalanasana (Equestrian pose)
This is how to perform Ashwa Sanchalanasana, combining information from several sources:
- Start with Tadasana, also known as Mountain Pose. As an alternative, it is performed just after Padahastasana (Standing Forward Bend) if it is part of Surya Namaskar.
- Extend One Leg Back: Take a breath and take a step back with your right foot to form a lunge. Make the most of your right leg’s rearward extension.
- Bend the Front Knee: A 90-degree angle should be formed by the left knee being exactly above the left ankle. The left foot stays planted. The thigh and the floor should be parallel.
- descend Hips and Pelvis: Feel a stretch in your right leg’s hip flexors and quadriceps as you gently descend your hips and pelvis toward the mat. The toes of the right knee are tucked in as it lies on the mat.
- Arm Alignment: Support the weight of the body with both arms straight. Lay the hands’ palms flat on the ground next to the feet. More experienced practitioners could reach the fingertips.
Modifications
- Use yoga blocks for extra stability.
- Instead of placing your hands on the floor, keep them on your hips.
- Throughout your practice, you can switch between high and low to check if you have the strength to go on the back foot; if not, position the knee back down.
Benefits of Ashwa Sanchalanasana (Equestrian pose)
- Enhances Muscle Strength: Enhances the muscles in the legs.
- Enhances Flexibility: When stretching, it provides the leg muscles with more suppleness.
stretches the hips, groin, deep iliopsoas muscle, and quadriceps. makes the spine longer. - Organ Stimulation: Improves the functioning of the abdominal organs by massaging them. balances the liver and kidneys.
- Nervous System Balance: Promotes nervous system equilibrium.
- Boosts Lung Capacity: By strengthening the chest muscles, the heart is opened up and the lung capacity is increased.
- Positive effects on mental strength include increased boldness, drive, and willpower.
Step 5. Dandasana (Stick pose)
Dandasana, commonly referred to as Staff Pose, is a fundamental seated yoga pose that places an emphasis on appropriate posture and alignment. This posture, which comes from the Sanskrit words “danda” (stick) and “asana” (pose), calls for you to sit with your back erect, feet together, and legs straight out in front of you like a staff. Although it can seem easy, perfecting Dandasana requires careful execution and conscious awareness.
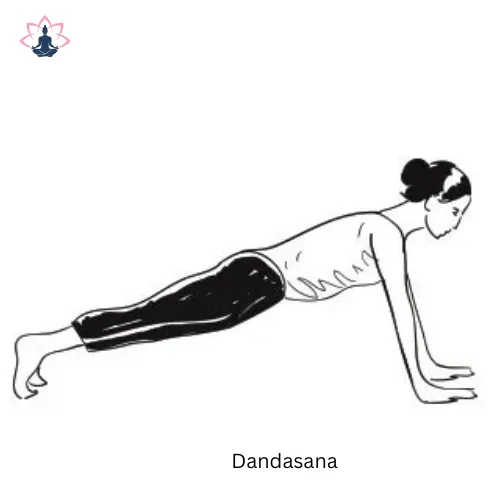
Step-by-Step Guidelines for Dandasana (Stick pose)
This is a detailed tutorial on how to do Dandasana:
- Start Seated: Take a seat with your back straight on the floor.
- Leg Extension: Keep your feet pointing up and close together as you extend your legs in front of you. You can maintain a tiny gap between your heels.
- Align and Engage: Slowly lengthen your back while maintaining an upright neck and pressing your hips down. Flex your feet and extend out through the heels. Press down on your sitting bones with your thighs.
- Positioning Your Hands: Straighten your arms and place your palms close to your hips, facing the floor.
- Breathe and Hold: Hold the pose for 20 to 30 seconds after taking a deep breath. Continue using your abdominal muscles.
- Advice for Novices: Use a folded blanket or block if you have trouble sitting with a straight back.
Spread your feet approximately hip-distance apart if it hurts to keep your legs together.
If you have too much feeling in your hamstrings, keep your knees slightly bent.
Benefits of Dandasana (Stick pose)
There are several mental and physical advantages of Dandasana:
- Strengthens Core and Spine: It makes the muscles in the core and spine stronger.
- Enhances Flexibility: It makes your hamstrings more flexible.
- Improves Body Awareness: Dandasana improves one’s general awareness of one’s body.
- Enhances Posture: Consistent practice can result in better posture.
- Lessens Back discomfort: It has the potential to lessen back discomfort.
- Enhances Muscle Strength: Enhances the strength of the back muscles.
- Strengthens Core Stability: Strengthens the core.
- Gets the body ready for the majority of sat positions.
Step 6. Ashtanga Namaskara (Salute with eight parts or points)
The sixth pose in the Sun Salutation (Surya Namaskar) sequence is Ashtanga Namaskara, sometimes referred to as the Eight-Limbed Pose. The eight points of the body that make contact with the ground during the posture are the two feet (toes), the two knees, the two palms, the chest, and the chin. The words “ashta” and “anga” in Sanskrit represent eight and portion, respectively. Devotees at Indian temples also honor the gods by striking this stance.
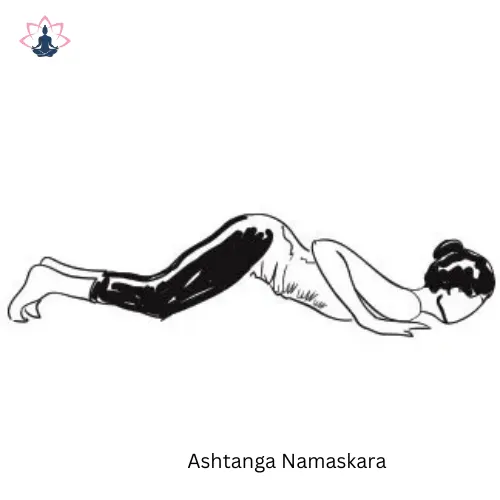
Step-by-Step Guidelines for Ashtanga Namaskara (Salute with eight parts or points)
Based on the given search results, here is how to conduct Ashtanga Namaskara:
- Begin in Phalakasana, or plank pose: Start with a plank posture.
- Bring your knees gently down to the mat by lowering them to the floor. Make sure your toes are tucked in.
- Lower Chest, Chin, and Elbow Bend: Bring your elbows back toward the rear of your mat. Bring your chin down to the floor and extend it forward as you drop your chest. Drop your chest to the floor between your palms.
- Keep Your Hips Up: Raise your hips, or pelvis. Your belly and hips should be just a little bit off the ground.
- Engage Core: Tone your abdomen (transverse abdominus, or Uddiyana Bandha) and engage the bottom of your pelvis (pelvic floor, or Mula Bandha). To use your core muscles, tuck your belly in.
- Hold the Pose: Use your chin, chest, arms, knees, and toes to evenly balance your body. Throughout the position, maintain a relaxed breathing pattern. For a few seconds, some customs hold the breath outside.
Benefits of Ashtanga Namaskara (Salute with eight parts or points)
Ashtanga Namaskara provides a number of advantages:
- increases the strength of the hand and leg muscles.
- makes the chest stronger.
- increases the spine’s and back’s flexibility.
- gives the muscles in the back strength.
- relieves stress and anxiety and helps you think clearly.
- strengthens and tones the muscles in each of the eight limbs.
- Back pain can be relieved and backbends can be experienced in this simple yoga pose for beginners.
- prepares you for Chaturanga Dandasana and strengthens your arms.
See also: Yoga Asana Types: A Complete Guide
Step 7. Bhujangasana (Cobra pose)
Cobra Pose, also known as Bhujangasana, is a fundamental backbending pose in yoga that is well-known for its capacity to open the chest, strengthen the back, and activate the abdominal organs. The term “Bhujangasana” comes from the Sanskrit word “bhujanga,” which meaning snake or cobra, since the position looks like a cobra with its hood raised. Most people can achieve this easy stance, which has many mental and physical advantages. In the Surya Namaskar (Sun Salutation) sequence, it is also the seventh pose.
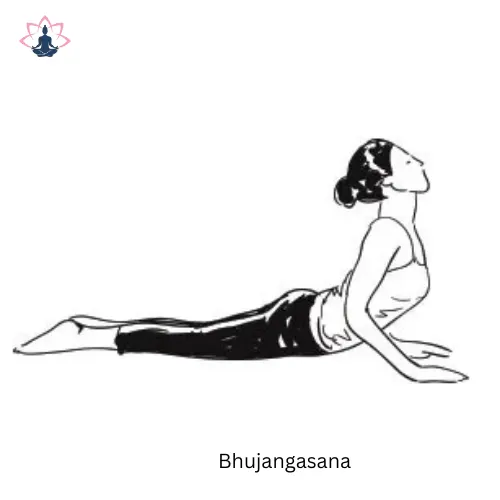
Step-by-Step Guidelines for Bhujangasana (Cobra pose)
This is a detailed tutorial on how to do Bhujangasana safely and successfully:
- Starting Position: Extend your legs and point your toes back while lying on your stomach. Put your forehead down on the floor.
- Positioning Your Hands: Lay your hands palms down, fingers wide apart, beneath your shoulders. Elbows should be kept close to the torso.
- Breathe and Lift: Take a deep breath and plant your palms on the ground. Remove your head, chest, and abdomen from the mat gradually. Your navel should remain on the ground.
- Engage Your Back: With the help of your hands, raise and pull your torso off the ground by using your back muscles. Be sure to apply the same amount of pressure to both palms.
- Hold the Pose: As you bend your spine vertebra by vertebra, continue breathing mindfully. Tilt your head back and look up; if at all feasible, straighten your arms by arching your back as much as you can.
- Maintain Alignment: To keep your alignment correct, keep your elbows slightly bent, your shoulders away from your ears, and your eyes forward.
- Hold and Breathe: Take deep breaths while maintaining the stance for 15 to 20 seconds. For four to five breaths, hold the posture while breathing steadily.
- Release: Slowly and softly exhale, then return your head, chest, and abdomen to the floor to unwind.
Repeat four or five times.
Benefits of Bhujangasana (Cobra pose)
There are several advantages to bhujangasana for mental and physical health:
- Enhances Shoulder and Back Strength: It enhances shoulder and back strength overall.
- Enhances Flexibility: Enhances the spine’s and the upper and middle back’s flexibility.
- Abdomen Toning: This tones the abdomen.
- Stimulates Organs: Encourages the abdominal cavity and genitalia to function.
- Opens Chest: Increases chest size, which enhances blood flow.
- Lowers Stress and tiredness: By restoring equilibrium to the neurological system, this technique lowers stress and tiredness.
- Mood Enhancement: Enhances your mood by energizing the nerve system, which fosters a feeling of health and optimism.
- Help for Respiratory Conditions: Beneficial for those suffering from respiratory conditions like asthma.
- Make your spinal muscles stronger. It tones the chest and lungs, strengthens the vertebral muscles, and extends the spine.
Step 8. Adho Mukha Svanasana (Downward facing dog pose)
Downward-Facing Dog, or Adho Mukha Svanasana, is a fundamental yoga position that is generally accepted and used in various yoga styles. In Sanskrit, Svanasana means “dog,” Adho means “downward,” and Mukha means “facing.” The term comes from the fact that the stance looks like a dog extending. This position combines elements of restorative pose, inversion, and arm balance.

Step-by-Step Guidelines for Adho Mukha Svanasana (Downward facing dog pose)
The following is a detailed guide to Adho Mukha Svanasana:
- Start on your hands and knees: Place your knees just below your hips and your hands slightly in front of your shoulders on the floor. Make sure your knees are behind your hips and your wrists beneath your shoulders. The table-top position is this.
- Elevate your hips while straightening your knees and elbows to create an inverted V shape with your body.
- Press into the ground: Widen through your shoulder blades and forcefully press your hands into the ground.
- Keeping your neck long means letting your ears rest on your inner arms. Verify the alignment of your head, neck, and spine. Look toward the direction of your nave.
- If at all feasible, straighten your legs by pressing your heels toward the floor and attempting to keep your spine as long as possible.
- Hold the posture: While maintaining the stance, take deep, prolonged breaths. Try to take 15 to 20 breaths.
- Return to Table-Top: To unwind, release your breath, bend your knees, and slowly return to the table stance. Do this up to eight times.
Beginner’s Tip: Raise your hands on a couple of blocks if you struggle to expand your shoulders. Additionally, you can practice using a chair or against a wall for support.
Benefits of Adho Mukha Svanasana (Downward facing dog pose)
Adho Mukha Svanasana has several advantages.
- Strengthens muscles: Makes the back, arms, and legs stronger. It strengthens the shoulders and arms.
- Stretches for the body: It works the hamstrings, calves, and spine. It increases the calf and hamstring muscles’ range of motion.
- Reduces pain and stiffness: By extending the spine and increasing oxygen delivery to the body, this treatment reduces stiffness and back discomfort.
- Increases circulation: Increases the legs’ blood flow.
- Gives the body energy: The entire body is revitalized and energized by downward-facing dogs.
Step 9. Ashwa Sanchalanasana (Equestrian pose)
An essential part of Surya Namaskar (Sun Salutation) is Ashwa Sanchalanasana, sometimes referred to as the Equestrian Pose or Low Lunge. “Sanchalana” means movement, “Asana” means stance, and “Ashwa” signifies horse in Sanskrit. This position encourages flexibility and balance while strengthening and stretching a variety of muscle groups.
Step-by-Step Guidelines for Ashwa Sanchalanasana (Equestrian pose)
Here’s how to do Ashwa Sanchalanasana step-by-step:
- Starting Position: Stand at the top of your yoga mat in Tadasana, also known as Mountain Pose.
- Extend One Leg Back: Take a breath and take a step back with your right foot to form a lunge. A 90-degree angle should be formed by the left knee being exactly above the left ankle. The toes of the right knee are tucked in as it lies on the mat.
- descend Hips and Pelvis: Feel a stretch in your right leg’s hip flexors and quadriceps as you gently descend your hips and pelvis towards the mat.
- Arm Alignment: Support the weight of the body with both arms straight. Place your palms flat on the ground next to your feet.
- Distribute your body weight over your hands, left foot, right knee, and right foot toes in the final pose. Arch your back, tilt your head back, and look up at the middle of your eyebrows.
- Breathing: Lean your right leg back and take a deep breath.
- Hold and Repeat: Keep your balance, take deep breaths, and hold the position. Repeat on the opposite side after easing out of the posture.
Benefits of Ashwa Sanchalanasana (Equestrian pose)
There are several mental and physical advantages of Ashwa Sanchalanasana:
- Muscle Strengthening: Leg muscles are strengthened.
- Enhances Flexibility: During stretching, the leg muscles become more flexible. opens the hips and groin and stretches the deep iliopsoas and quadricep muscles. makes the spine longer.
- Abdominal Organs: The position enhances the functioning of the abdominal organs by massaging them.
- Encourages Equilibrium: Brings the neurological system into equilibrium3.
- Boosts Lung Capacity: By strengthening the chest muscles, the heart is opened up and the lung capacity is increased.
- Positive effects on mental strength include increased boldness, drive, and willpower.
Step 10. Hastapadasana (Standing forward bend)
A basic yoga pose with many mental and physical advantages is hastapadasana, often referred to as the Hand-to-Foot Pose or the Standing Forward Bend. The name emphasizes the goal of the position, which is to bring the hands to the feet, and is derived from the Sanskrit words “Hasta” (hand) and “Pada” (foot). A crucial component of the Surya Namaskar routine, it is.
Step-by-Step Guidelines for Hastapadasana (Standing forward bend)
- Starting Position: Place your arms at your sides and stand upright with your feet together. Your weight should be evenly distributed over both feet.
Breathe in by raising your arms over your head. - Exhale and Bend: As you release your breath, bend forward from your hips and move in the direction of your feet. Try to maintain a straight spine and legs.
- Hold: If you are unable to reach the floor, try to lay your hands on your legs or on the floor next to your feet. Your ankles can be held.
- Deep Breathing: Hold the pose for 20 to 30 seconds while taking deep breaths. Try to raise your hips and tailbone higher with each exhale by bringing your chest closer to your knees. Move your head slowly in the direction of your feet.
- Breathe in, extend your arms upward, and then gently bring yourself back to a standing posture.
- Release the breath by lowering your arms to your sides.
Benefits: Throughout the position, take calm, deep breaths in and out. Better outcomes could also come by holding your breath in the holding position.
Benefits of Hastapadasana (Standing forward bend)
- Stability and Flexibility: Enhances stability and flexibility.
- Stretches Muscles: This technique stretches the back muscles. Flexibility exercises for the entire body target the hamstrings and glutes. The pituitary, adrenal, thyroid, endocrine, and pineal glands are among the glands that are stimulated.
- Stress Reduction: Lower back and thigh muscle flexibility reduces stress.
- Better Circulation: Enhances blood flow throughout the upper body.
- Digestive Aid: Enhances liver and spleen function and speeds up metabolism. Constipation symptoms can be reduced and digestion aided by gently compressing the abdomen.
- Spinal health: improves posture and lengthens the spine.
- nerve System: Increases blood flow to the nerve system, energizing it.
Step 11. Hastauttanasana (Raised arms pose)
A basic yoga pose that is frequently performed as part of the Sun Salutation (Surya Namaskar) sequence is Hasta Uttanasana, also known as the Raised Arms Pose. As the sequence’s second and eleventh posture, it opens the chest for deeper breathing while strengthening and warming the spine. Most people can achieve this stance, which has several advantages.
Step-by-Step Guidelines for Hastauttanasana (Raised arms pose)
Here is a detailed method to successfully doing Hasta Uttanasana:
- Start in Tadasana by standing tall, keeping your arms at your sides, your feet together, and your weight properly distributed. Pay attention to steady, deep breaths.
- Engage Your Legs: For stability, squeeze your legs together while using your thigh muscles.
- Raise Your Arms: As in Urdhva Namaskarasana1, take a deep breath and raise your arms aloft, bringing your palms together. Look up at your hands while maintaining a straight arm position.
- Shift Hips Forward: To keep your balance, gently shift your hips forward while putting your legs down.
- Activate Pelvic Floor: For support, contract your pelvic floor muscles.
Benefits of Hastauttanasana (Raised arms pose)
- Enhances Digestion: This position has the potential to enhance digestion.
- Tones and Stretches Muscles in the abdomen: Tones the abdominal region.
- Increases Chest and Rib Cage: It increases the chest and rib cage, which makes it possible to completely utilize the lung’s capacity and take in oxygen.
- Spine Strengthening: Make the spine stronger.
- Stretches Shoulders and Upper Back: Regularly performing this exercise can help you stretch and open up your shoulders and upper back.
Step 12. Tadasana (Mountain Pose)
The foundation of all other standing poses in yoga is Tadasana, also known as Mountain Pose. Tadasana may appear to be just standing, but it actually entails subtle alignment and engagement that improves posture, grounds the mind, and develops body awareness.
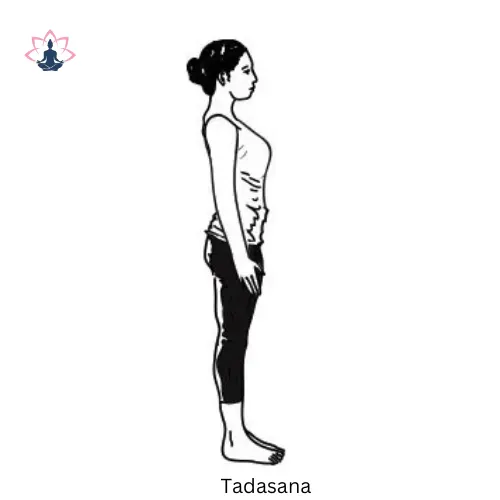
Step-by-Step Guidelines for Tadasana (Mountain Pose)
- Stand Tall: Start with your heels slightly apart and your big toes touching. For improved balance, some people prefer a hip-width distance.
- Feel your feet on the earth by grounding them. Gently raise and spread your toes, then bring them back down. Spread your weight equally over your feet’s four sides.
- Lift your kneecaps without locking your knees to engage your legs. Pull the muscles in your thighs up and back.
- Align Your Pelvis: Make sure your pelvis is in a neutral posture by releasing your tailbone and softening the skin of your lower back. To avoid flattening the lumbar curvature, do not tuck your tailbone.
- Engage Your Core: To stabilize your spine, gently bring your pelvic floor muscles together and mildly contract your abdominal muscles.
- To open your chest, raise your sternum toward the ceiling while maintaining a soft rib cage. Expand your collarbones and press your shoulder blades firmly into your back. Don’t circle your shoulders.
Tips for Beginners
- Keep your knees slightly bent if you have knee problems.
- Place your back against a wall for support if you have trouble staying balanced.
- To increase your equilibrium, close your eyes.
Benefits of Tadasana (Mountain Pose)
- Enhances Posture: Tadasana prevents slouching by balancing the spine and strengthening the core muscles.
- Boosts Body Awareness: You become more conscious of your body and any imbalances by focusing on the small changes in the position.
- Muscle Strengthening: It subtly tones the muscles in the legs, thighs, and buttocks.
- Calming: Tadasana helps you get ready for meditation or other yoga positions by calming your body and mind.
- It lays the groundwork for all other standing positions by preparing the body.
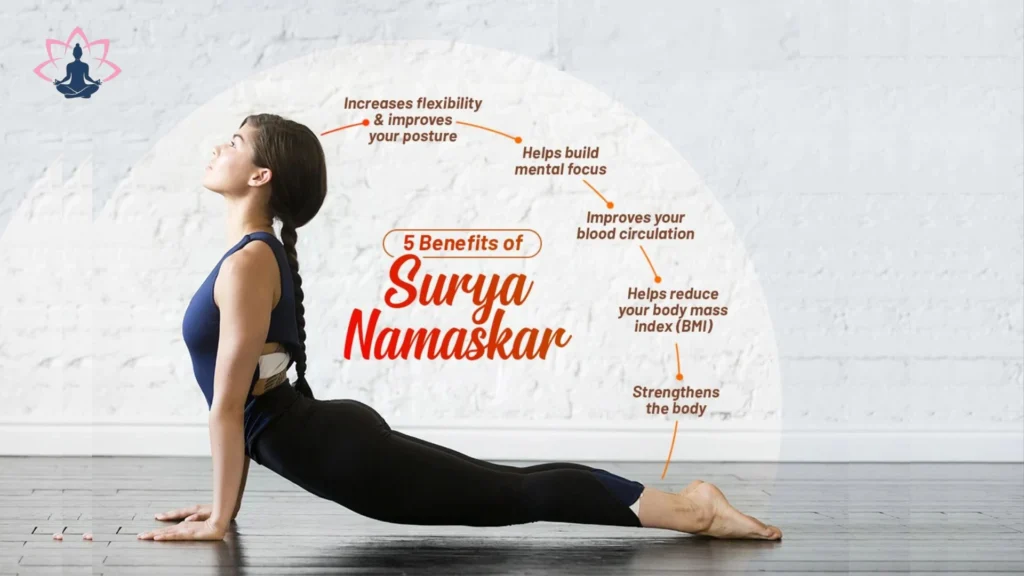
The Many Benefits of Sun Salutations
Surya Namaskar offers a wealth of benefits for physical and mental well-being.
Surya Namaskar Video
Physical Benefits for Surya Namaskar
- Tones the joints and muscles. Together, the twelve poses strengthen the joints and muscles in every area of the body. The muscles, joints, and ligaments are stretched, strengthened, and toned. Frequent practice increases spine flexibility and muscle strength.
- promotes weight loss Surya Namaskar is a vigorous physical workout that helps people lose weight. In addition to stretching your abdominal muscles, the postures increase your metabolism over time and cause you to perspire if you practice more frequently. 14 calories are burned during one Surya Namaskar cycle.
- enhances cardiovascular well-being Cardiovascular health is enhanced by regular Surya Namaskar practice. The positions can support the cardiovascular health of practitioners. The effects of Fast Surya Namaskar are comparable to those of physical aerobic activities.
- increases immunity With consistent practice, the critical internal organs operate better. Blockages are released, blood circulation and oxygen delivery improve, and immunity is strengthened. Steps from Surya Namaskar can also strengthen immunity and help your body fight off illnesses and infections.
- helps with detoxification Because of the established breath patterns, the lungs are ventilated and the blood receives more oxygen, which aids in detoxification and improves the flow of lymph, which transports toxins to the excretory organs.
- controls the cycle of menstruation. Surya Namaskar helps create a more balanced cycle, lessens menstrual pain, and controls the menstrual cycle. Postures boost hormonal health by stimulating sluggish glands.
- enhances the quality of sleep Surya Namaskar can reduce or even cure insomnia and enhance the quality of sleep. Asanas help the body and mind relax and release tension, which makes it easier to get a good night’s sleep.
- Enhances flexibility: Raised Arms Pose works your shoulders, arms, and back, while Downward Facing Dog and Uttanasana specifically target your hamstrings.
Mental Benefits:
- Start Slowly: If you’ve never done Surya Namaskar before, start with three to five cycles a day and work your way up to eleven or more as your strength and endurance build.
- Warm-up: To get your muscles and joints ready for the sequence, start with some simple stretches.
- Controlled Breathing: Take a breath as you extend and release it as you fold, coordinating each movement with your breath.
- Listen to Your Body: Take note of any aches or pains and adjust the poses accordingly.
- The Key Is Consistency: To reap the full advantages of Surya Namaskar, try to do it on a regular basis, preferably before sunrise.
- Adho Mukha Svanasana (Downward-Facing Dog), Bhujangasana (Cobra Pose), Uttanasana (Standing Forward Bend), and Tadasana (Mountain Pose) are among the 12 positions, however there are variants.
Conclusion
The Sun Salutation, also known as Surya Namaskar, is a holistic practice that combines movement, breathing, and awareness to awaken and energize the body, mind, and spirit. It is not only a series of exercises. Frequent practice has several advantages, including bettering digestion, circulation, and general well-being in addition to boosting strength and flexibility. Additionally, it helps with intuition, sleep quality, and stress and anxiety reduction. Integrating Surya Namaskar into your daily routine may be a potent method to create physical, mental, and spiritual balance, regardless of your level of experience with yoga or where you are in your health path. Breathing, controlled motions, and mantras are all part of suryanamaskar, which promotes mental calm and relaxation. Through this energetic activity, you may worship the sun and discover your inner brilliance, leading to a life full of vitality, equilibrium, and happiness.
FAQ
What are the benefits of Surya Namaskar?
What are the benefits of Surya Namaskar?
Surya Namaskar offers numerous benefits, including increased strength and flexibility, improved circulation and digestion, stress reduction, enhanced sleep quality, and improved cardiovascular, metabolic, and respiratory health3. It also helps in balancing energy levels and improving body awareness.
How many rounds of Surya Namaskar should I do?
How many rounds of Surya Namaskar should I do?
Start with 3-5 rounds and gradually increase as your strength and stamina improve. Some practitioners aim for 11 or more rounds daily.
Is Surya Namaskar good for weight loss?
Is Surya Namaskar good for weight loss?
Yes, Surya Namaskar can aid in weight loss. It stretches the abdominal muscles, improves metabolism, and, when practiced at a faster pace, can help burn calories. One round of Surya Namaskar burns 14 calories.
Can Surya Namaskar improve my sleep?
Can Surya Namaskar improve my sleep?
Yes, Surya Namaskar can improve sleep quality and reduce insomnia by easing tension and promoting relaxation throughout the body and mind.
Does Surya Namaskar have any mental health benefits?
Does Surya Namaskar have any mental health benefits?
Yes, it reduces stress and anxiety, enhances intuition, improves focus, and promotes a sense of inner calm. Regular practice balances the nervous system and can improve emotional stability.
Is Surya Namaskar suitable for beginners?
Is Surya Namaskar suitable for beginners?
Yes, Surya Namaskar is suitable for practitioners of different levels. Variations and modifications can be made to accommodate individual needs and abilities.
How does Surya Namaskar improve the digestive system?
How does Surya Namaskar improve the digestive system?
It increases blood flow in the intestines, leading to smoother functioning of the digestive tract. The stretching and forward bend postures also help release trapped gas and improve digestion.
Can Surya Namaskar boost immunity?
Can Surya Namaskar boost immunity?
Yes, the functioning of vital internal organs improves with regular practice. Blood circulation and oxygen supply improves, blockages get released, helping build immunity.
What is the importance of breathing in Surya Namaskar?
What is the importance of breathing in Surya Namaskar?
Synchronizing breath with the body postures is crucial. It helps control and deepen the breath, leading to a healthy mind and body.
Are there different variations of Surya Namaskar?
Are there different variations of Surya Namaskar?
Yes, there are different routines and variations of Surya Namaskar. The sequence, pace, and emotional approach can vary. Dr. Swami Gitananda identified seventeen distinct routines.